Special FX Focus: Hard Shell Masks (Part 2)
OFFICIAL MEDIA CHANNELS
New film trailers and videos
Check us out!
Check out Unreal Radio!
| The Unreal Film Festival is owned and managed by Cellardoor Cinema. Copyright 2016 |
Now that it's getting close to Halloween once again, I'm back with the 2nd part of my DIY Hard
Shell Masks article. I know. It’s been a while before making part two of this process. The truth lies
in what I mentioned at the start, though – never have I used slushable plastics before. It has been
quite the learning curve, but I’ve got a grasp on it. I had to run four more pours to the original mask
because it was still too thin for drilling and even handling in part. That done, though, let’s get into
what I did to finish it up. And also, if you missed my first article on setting this all up, you can find it
here: Special FX Focus: Hard Shell Masks (Part I).
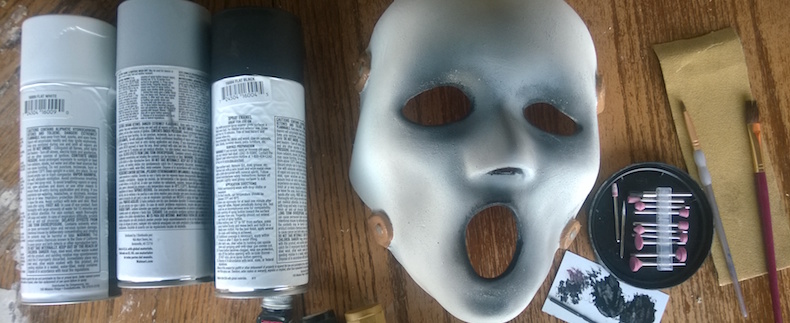
First of all, I gathered the tools and supplies I knew I’d need: Art brushes, sand paper, model
paints, a thin hack saw blade (not in the handle), a drill and drill/rotary bits (use a rotary tool if you
wish to) and even keeping it more old school for those of you who still may not have an airbrush to
use, I used basic spray paints (white, grey primer and black in color).
Shell Masks article. I know. It’s been a while before making part two of this process. The truth lies
in what I mentioned at the start, though – never have I used slushable plastics before. It has been
quite the learning curve, but I’ve got a grasp on it. I had to run four more pours to the original mask
because it was still too thin for drilling and even handling in part. That done, though, let’s get into
what I did to finish it up. And also, if you missed my first article on setting this all up, you can find it
here: Special FX Focus: Hard Shell Masks (Part I).
First of all, I gathered the tools and supplies I knew I’d need: Art brushes, sand paper, model
paints, a thin hack saw blade (not in the handle), a drill and drill/rotary bits (use a rotary tool if you
wish to) and even keeping it more old school for those of you who still may not have an airbrush to
use, I used basic spray paints (white, grey primer and black in color).
|
|
| Unreal Film Fest Sponsors: |

Stay up to date on Fest News


Step one was to find a thin drill/rotary bit
to start holes in the mask plastic where I
would need to remove area for eye holes, the
nose hole and the mouth hole. This can be
kind of a tedious task, but it's much better to
take your time, than to rush and potentially
make a mistake like cracking your mask,
which would then force you to start over.
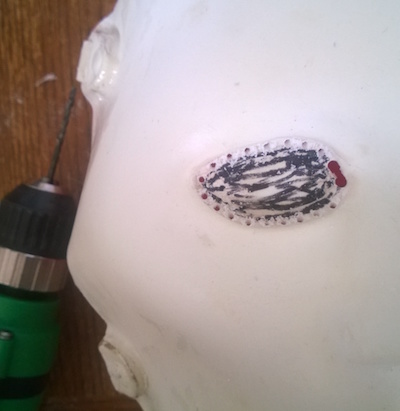
| (Small "pilot" holes initially drilled around the eyes) |
Step three is positioning the mask for
painting. I rigged mine onto a microphone
stand, but simply setting the mask onto old
plastic would have sufficed. You always
primer something first, so grey primer was
the first wave. After about ten minutes to dry,
I then hit the eye, nose and mouth hole areas
with short bursts of black spray paint.
Another ten minutes, and I hit the mask with
short and specific bursts of white spray
paint. This method could have been
painstakingly worse, but I got lucky the first
go-round with it all. Again, this was to prove
that old school methods of painting a mask
are still viable.
After more drying time, I used silver,
brown and black model paints with a small
art brush per each to carefully color areas of
the mask that are supposed to look like metal
rivets, leather strapping, and using the black
model paint to stipple around the eye, nose
and mouth holes for just a bit more detail.
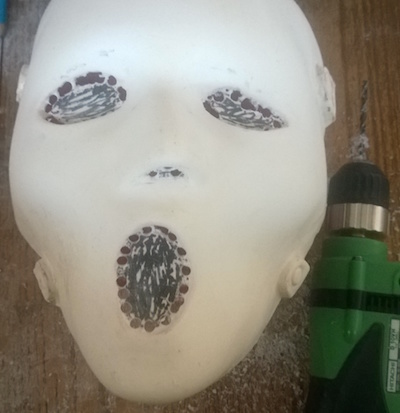
After getting these small "pilot" holes all
in place bordering the area, I simply repeated
with slightly bigger drill bits until I had big
enough spaces with which to insert the thin
hack saw blade through them. You should
also be careful not to press down too hard on
the drill when drilling out the holes, or you
could crack your mask that way too. Just
relax and let the drill do the work.
| (Larger holes drilled, guided by the "pilot" holes) |
Step four was after waiting a good hour or so of drying, positioning the mask for one last thing,
and that was to use a clear coat spray (looks just like spray paint in a can), and I carefully, again
using short bursts hit coverage to the entire mask. This stuff beads up and can get thick real
easily, so that’s why it’s important to just use short bursts and even spray it from a two to three foot
distance, as well. When dry (and definitely read the clear coat spray can for the exact drying time),
you should find yourself quite proud of your achievement.
So that's it for this addition to the Special FX Focus Series. If you're looking for Halloween
costume ideas or want to check out past articles in the Special FX focus series where I show you
how do create other effects and masks. Check out the links below.
Until next time…keep on creeping on, everyone.
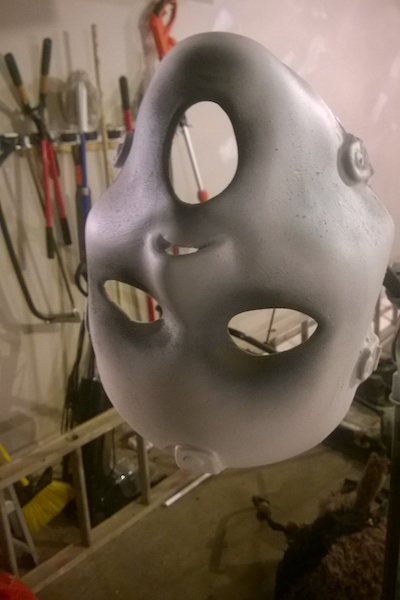
| (Mask positioned for painting) |
Duane P. Craig is a practical fx artist and screenwriter in Memphis, TN and you can listen to
Duane on our bi-monthly podcast "Unreal Radio".
Past Articles in the Special FX Focus Series:
Hard Shell Masks (Part 1)
Creating your own Sock Masks
Special FX on the Go (Part 2)
Special FX on the Go (Part 1)
Veining and Infection Looks
Skinning Techniques for Silicone and Latex
Monster Teeth
Scarring and Wounds using Rigid Collodion
An FX Artist's Kit
Applications for Liquid Latex