Special FX Focus: Hard Shell Masks (Part I)


OFFICIAL MEDIA CHANNELS
New film trailers and videos
Check us out!
Check out Unreal Radio!
| The Unreal Film Festival is owned and managed by Cellardoor Cinema. Copyright 2016 |
Having friends means having folks ask you what all you can do per FX capabilities…haha. That’
s fine because I would be challenging myself, anyway. This time around, I was asked about being
able to produce hard shell, plastic masks…because this friend has a wall of his favorites hanging
up on display. I’ve always wanted to make some, but I just never got around to it. Silicone, latex or
polyfoam were my usual go-to supplies and always worked. Not anymore, though. I’m learning to
use 1-to-1 ratio, pourable, slushable plastic. In particular, I’m using EasyFlo60 Liquid Plastic from
BITY Mold Supply. As this has become a quite involved partaking, we’re breaking this up into two
articles – part one, just on the producing the mask shell.
The rest of my supplies are as follows: Head armature, sculpting clay and tools, mixing cups,
mixing sticks, Sharpie/marker, nitrile or latex gloves, plaster and/or plaster bandages, needle and
thread, Vaseline or release agent, water-based acrylic paint and some Gel-10 or Gel-00 silicone.
Also, definitely wear some old clothes doing this. You’ll ruin your clothes getting this plastic into
them.
|
|
| Unreal Film Fest Sponsors: |

Stay up to date on Fest News
Duane P. Craig is a practical fx artist and screenwriter in Memphis, TN. You can check
out past articles in the Special FX Focus series by visiting our Article Archive and you
can listen to Duane on our bi-monthly podcast "Unreal Radio".
out past articles in the Special FX Focus series by visiting our Article Archive and you
can listen to Duane on our bi-monthly podcast "Unreal Radio".


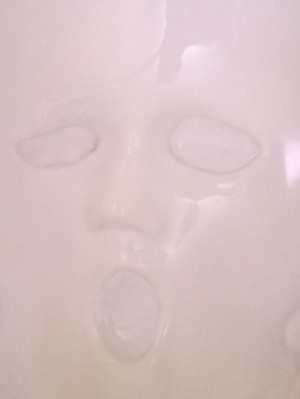
Step one was my sculpt, and I can’t show you how much of a pain it was to recreate because I
actually lost those pictures. What occurred was a blend of using the inside of a thin mask to start
and shape my clay, and then I had to add more clay and do lots of shaping after the fact to get the
odd proportions as needed.
actually lost those pictures. What occurred was a blend of using the inside of a thin mask to start
and shape my clay, and then I had to add more clay and do lots of shaping after the fact to get the
odd proportions as needed.

Step five was where the needle
and thread come into play and why I
didn’t plaster so much on my edges.
I basically stitch about ten or so
places along my silicone mold edge
into the plaster bandage edge. This
helps my silicone mold keep from
flopping over into itself (and into my
mix that I’d be slushing inside the
mold) and therefore ruining my
slushing, as well it is one of the most
annoying things ever. Also, I
greased inside my mold with a very
thin coat of Vaseline to act as my
release agent.
Step two was to mix my Gel-10 (I
colored it with water-based blue
acrylic paint) to mold my sculpt.
colored it with water-based blue
acrylic paint) to mold my sculpt.
Step four was waiting overnight to let the plaster harden well enough. Basically, you should
give it a good 12 hours. I always like to anyway.
give it a good 12 hours. I always like to anyway.
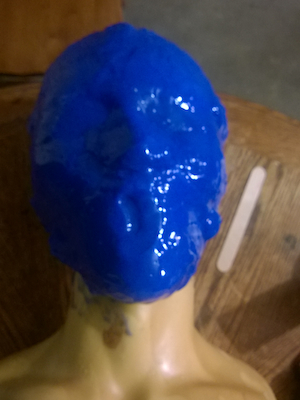
Step three was reinforcing my
mold with plaster bandages and
then, for extra measure, I mixed
more plaster to rather layer upon the
middle area of the bandages, but I
made sure not to get it around the
edges at all.
mold with plaster bandages and
then, for extra measure, I mixed
more plaster to rather layer upon the
middle area of the bandages, but I
made sure not to get it around the
edges at all.

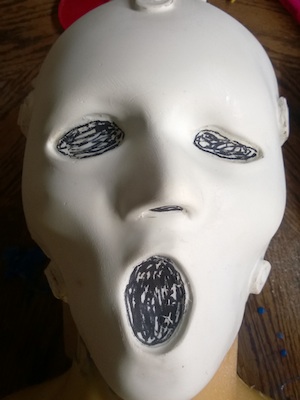
Step seven was pulling my
EasyFlo60 poured, hard shell mask
from my mold. I had to clip my
stitchings and actually pull my
silicone mold from my plaster
reinforcement before still rather
peeling off the silicone from the
mask. It’s that rare thing of beauty
where one gets it just right the first
time. With my black Sharpie/marker,
I have gone ahead and colored the
areas of the eyes, nose and mouth
because in part two of this
process…well, it’s rotary tool
time…and that is a beast unto itself.
Next month, we’ll finish up this
“unidentified/I’m not sure I’m allowed
to speak the name of” hard shell
mask for my friend’s collection.

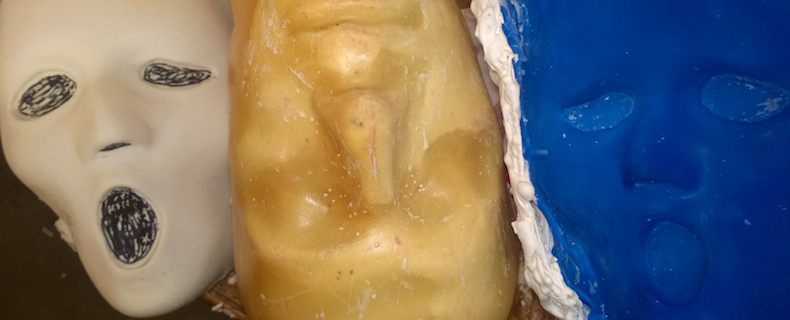
Step six was mixing the EasyFlo
resin (again, it was a 1-to-1 mix,
pretty simple). I didn’t mix much,
either. I promise you it wasn’t more
than a tablespoon of each, and after
mixing and pouring into my mold to
slush around, IT GOES
FAST…so…it got messy slushing it
around. I had probably less than 3
minutes to slush it in the mold. I had
to repeat this step 5 more times
before I was satisfied that the mask
would be thick enough. Between
each time repeating, I waited a good
30 minutes, though, so again, this
became quite a time consuming
process.