
SFX Focus: Creating your own Sock Masks


OFFICIAL MEDIA CHANNELS
New film trailers and videos
Check us out!
Check out Unreal Radio!
| The Unreal Film Festival is owned and managed by Cellardoor Cinema. Copyright 2015. |
As promised, I’m sharing with you folks how to make your own sock mask using Gel-00 (or Gel-
10) silicone. The mask you create will last forever or until you cut it up or throw it in a fire.
Gel-silicones are very, very hard to tear and don’t deteriorate unless in harsh, desert conditions,
outdoors for years. Yeah, it’s high quality.
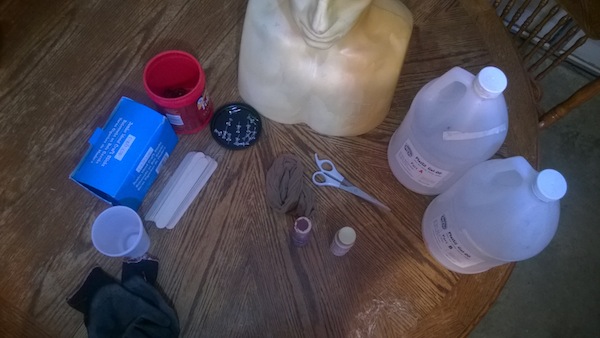
Let’s get going. Here’s what you’ll need this time around: One pair of women’s panty hose or
hose-socks (size large to fit over a head), a head armature or mannequin head or similar-life-size
head shape, Gel-00 (or Gel-10), thumb tacks, scissors, water-based acrylic paint (I’m using dark
red and leathery-brown), popsicle/stir sticks, plastic cups and gloves if you want ‘em.
10) silicone. The mask you create will last forever or until you cut it up or throw it in a fire.
Gel-silicones are very, very hard to tear and don’t deteriorate unless in harsh, desert conditions,
outdoors for years. Yeah, it’s high quality.
Let’s get going. Here’s what you’ll need this time around: One pair of women’s panty hose or
hose-socks (size large to fit over a head), a head armature or mannequin head or similar-life-size
head shape, Gel-00 (or Gel-10), thumb tacks, scissors, water-based acrylic paint (I’m using dark
red and leathery-brown), popsicle/stir sticks, plastic cups and gloves if you want ‘em.
|
|
| Unreal Film Fest Sponsors: |

Stay up to date on Fest News


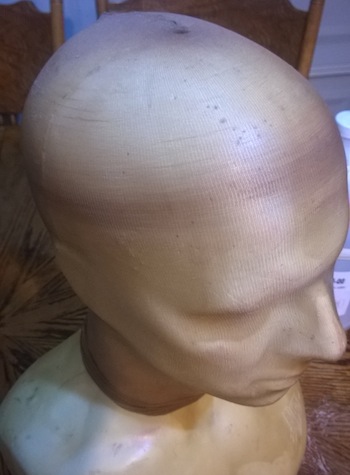
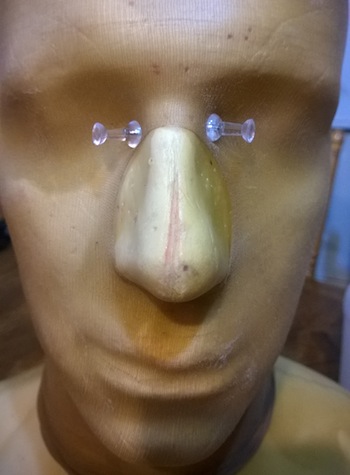
The first round of things includes cutting the panty hose near where the shins would be (or
just grabbing one hose-sock). You want the sock portion of the hose because the seam is there
and will stretch over the head armature accordingly. As soon as it is stretched and shaped in
place per how you’ll wear it, you want to cut a slit where the nose of the head armature is (so it’s
imperative to have a nose on your armature, even if you have to sculpt a temp out of clay). Why is
this important? You want the silicone to create a perfect nose-cover/cavity for your own nose to fit
inside of. You don’t want to smash your nose down uncomfortably flat the whole time you’re
wearing it. The last step in this portion is to use some thumb tacks to push/hold flat the hose into
the eye cavities. You will eventually cut away any silicone that gets on these tacks and the nearby
area, so don’t worry about that. What this does is help you create eye socket shaping and contour
to better fit on your face.
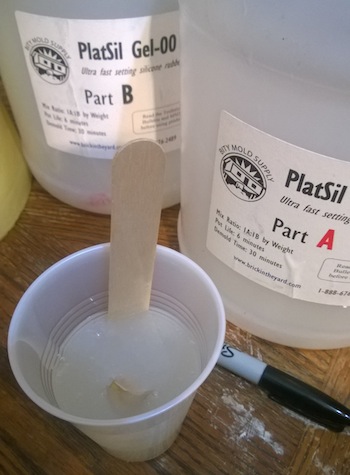
Round two is where you mix your Gel-silicone in a plastic cup. I’m mixing about 8oz. or half a
cup of total Gel – that means going by the 1A:1B ratio you have to use, I have 4oz of part A in the
cup and 4oz of part B in the cup. A 1 to 1 mix equaling a total of 8oz. I also immediately squirt
cup of total Gel – that means going by the 1A:1B ratio you have to use, I have 4oz of part A in the
cup and 4oz of part B in the cup. A 1 to 1 mix equaling a total of 8oz. I also immediately squirt
about three drops of my water-based acrylic
paint color that I have chosen as my base skin
color overall. I’m going for a Texas Chainsaw
Massacre inspired, torn off face look, so I’m
using a leathery-brown color. I then use my
stir stick to mix it all until it’s the one solid color
(the best way to know it’s mixed thorough) and
proceed to further use my stir stick like frosting
a cake. I have plenty of silicone to cover a full
facial area – up under the chin, into the hairline
of the forehead, back on the sides to almost
where the ears would be and of course, I make
sure the nose has solid coverage. I try to save
a small amount of my silicone in the cup,
though, and I squirt in just enough of my dark
red acrylic paint to give it a gory-red-meat
color. Yeah, this is going to immediately go
around the areas of the mouth and eyes. You’
ll see that the point is to make it look like the
skin of whoever’s face had to have the mouth
and eye “holes” cut out for use.
| (Supplies needed to create your own Sock Mask) |
| (Hose fitted over head armature) |
| (Nose area cut out of hose) |
| (Mixing Gel in a One to One Ratio) |
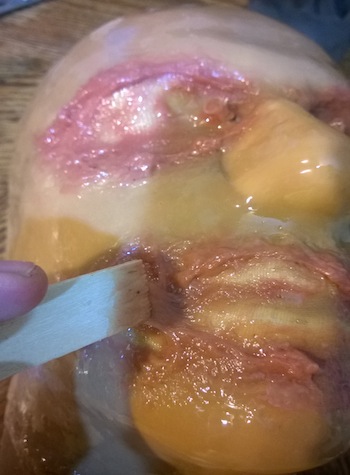
Round three is the immediate and
continuous use of a broken stir stick (because
you’ll have serrated edges to make better
texture with) and constantly shape your edges
with. This could take up to 10 minutes, so be
ready for this step as soon as you even think to
mix your silicone in the first place. When the
silicone really starts to set, it gums up and
begins keeping whatever harsh shapes, cuts
and such that you desire. I love asymmetry and
interesting textures, so I never leave a sock
mask looking too “slick.”
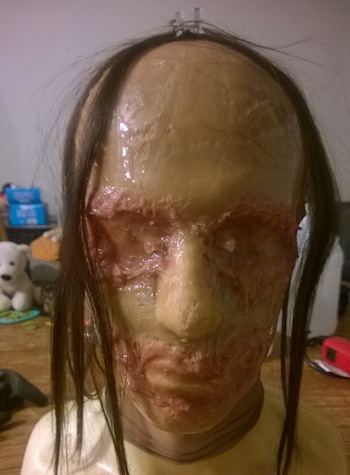
Round four would be waiting about another
30 mins before pulling the mask from the
armature and cutting out the eye and mouth
holes (leave the nose alone – you’ll be able to
breathe fine). Powder it, call it done and try it
on. That’s if you don’t have theatrical hair or old
wig hair you want to apply, though…like I
do…like I prefer to use, so…
continuous use of a broken stir stick (because
you’ll have serrated edges to make better
texture with) and constantly shape your edges
with. This could take up to 10 minutes, so be
ready for this step as soon as you even think to
mix your silicone in the first place. When the
silicone really starts to set, it gums up and
begins keeping whatever harsh shapes, cuts
and such that you desire. I love asymmetry and
interesting textures, so I never leave a sock
mask looking too “slick.”
Round four would be waiting about another
30 mins before pulling the mask from the
armature and cutting out the eye and mouth
holes (leave the nose alone – you’ll be able to
breathe fine). Powder it, call it done and try it
on. That’s if you don’t have theatrical hair or old
wig hair you want to apply, though…like I
do…like I prefer to use, so…
| (Applying gel to hose on head armature) |
(OPTIONAL) Round five – before ever pulling the mask from the armature, go ahead and mix
maybe half an ounce of your silicone (leave it uncolored because you’re using this as a hair
adhesive only) and then spread it in about a one inch thick line in the top-middle of the head going
maybe further down the back of the head, if at all. Quickly get your theatrical hair for use, lay it
down, really press it into place making sure it is sticking and further use thumb tacks to hold it in
place. It’s going to get messy in this step, but be patient because it is well worth it. Wait for the
silicone to dry, and then pull your whole mask (cut for eye holes and mouth hole). Powder it, call it
done and try it on.
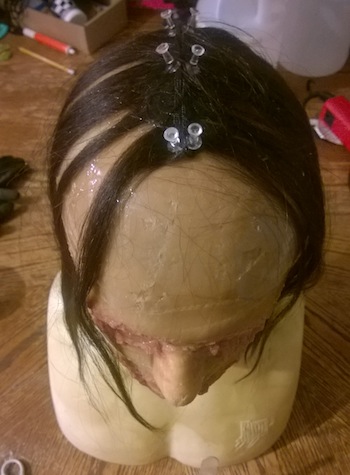
| (Hair glued to mask with silicone. Thumb tacks used to hold in place while drying) |
Extras you can do to your liking is putting any grease paint colors or fake blood on your mask.
You have all kinds of options, really. Have fun!
Duane P. Craig is a screenwriter and special effects artist working from Memphis, TN. You can
check out other articles of his in the SFX Focus series by visiting our News Archive section.
You have all kinds of options, really. Have fun!
Duane P. Craig is a screenwriter and special effects artist working from Memphis, TN. You can
check out other articles of his in the SFX Focus series by visiting our News Archive section.